Quick Setup Guide - Scan2Maintenance
Welcome to the Scan2Maintenance Quick Setup Guide.
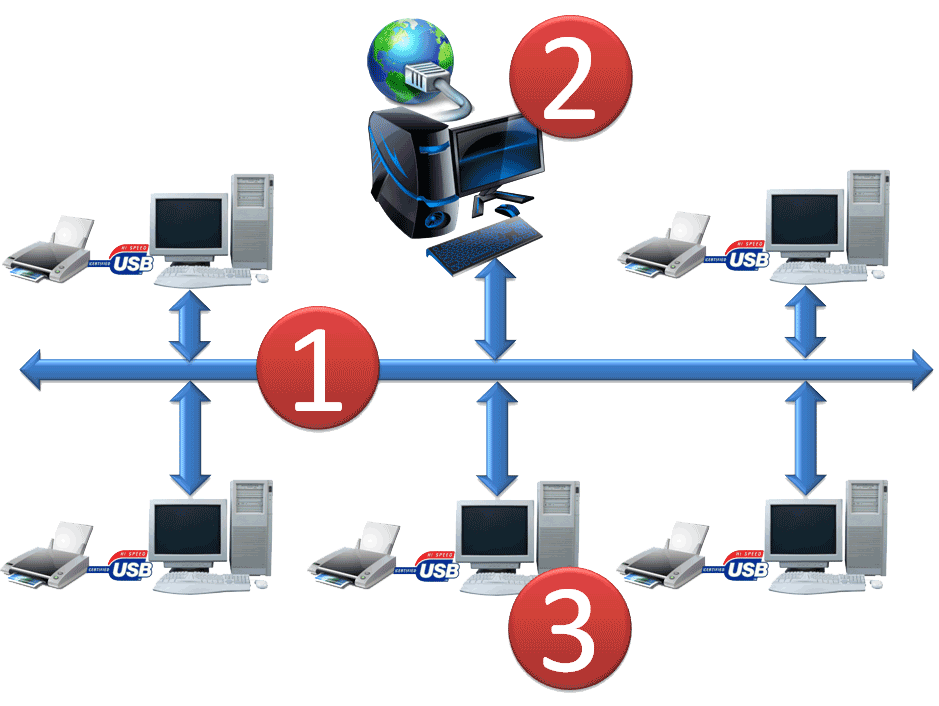
Please click on each step numbered 1, 2 & 3 to setup your installation.
Step
![]() : Setting up a
shared network drive:
: Setting up a
shared network drive:
Prerequisites:
The Scanner Client computer is physically attached via USB to the Document scanner and has network access to Scanner Server. The Scanner Client computer does not require access to the Internet, however this is desirable for software updates.
The Scanner Server computer does not need to be physically connected via USB to the document scanner. The Scanner Server can be any computer which has network accessibility to the client computer. The Scanner Server computer must have access to the Internet.
Overview:
The Scanner Client and Scanner Server communicate with each other by a shared network folder. The shared network folder is a common location which can be read & write assessable by the Scanner Client and Server.
Procedure: The setting up of the shared network folder is identical for both Scanner Client & Server computers. The procedure will differ dependent on the Windows operating system. Windows XP, Window 7 & Windows 8 procedures are shown as follows.
To connect and disconnect a network drive in Microsoft Windows XP,
you can use one of the four methods that are described in this article.
You can map a drive letter to any shared resource on a network. When you
do so, you can quickly and easily access the resource by using either
the Windows XP user interface or a command prompt. For each mapped
drive, an icon appears in My Computer and a listing appears in the left
pane of Windows Explorer.
Connect a drive from My Network Places
1. Click Start, click My Network Places, click Entire Network, and then
double-click Microsoft Windows Network.
2. Double-click the domain that you want to open.
3. Double-click the computer that has the shared resource you want to
map. All the shared resources for that computer automatically appear in
the window.
4. Right-click the shared drive or folder that you want to map, and then
click Map Network Drive.
5. Click the drive letter that you want to use, and then specify whether
you want to reconnect every time that you log on to your computer.
![]() Note: Network drives are mapped by using letters starting from the
letter Z. This is the default drive letter for the first mapped drive
you create. However, you can select another letter if you want to use a
letter other than Z.
Note: Network drives are mapped by using letters starting from the
letter Z. This is the default drive letter for the first mapped drive
you create. However, you can select another letter if you want to use a
letter other than Z.
6. Click Finish.
A windows opens that displays the contents of the resource you
mapped.
Connect a drive from My Computer or Windows Explorer
1. To connect a drive from My Computer, click Start, right-click My
Computer, and then click Explore.
To connect a drive from Windows Explorer, right-click Start, and then
click Explore.
2. On the Tools menu, click Map Network Drive.
3. In the Drive box, click a drive letter.
4. In the Folder box, type the UNC path for the server and shared
resource in the following format: \\server name\share name. You can also
click Browse to find the computer and shared resource.
You can map shared drives and shared folders. When you access a shared
drive or folder you can also access subfolders if you have the
appropriate permissions. However, you cannot map a drive for a subfolder
that is not explicitly configured as a shared resource.
Use the Net Use command to map or disconnect a drive
You can use the net use command for batch files and scripts. To use the
net use command to map or disconnect a drive:
• To map a network drive:
1. Click Start, and then click Run.
2. In the Open box, type cmd.
3. Type net use x: \\computer name\share name, where x: is the drive
letter you want to assign to the shared resource.
• To disconnect a mapped drive:
1. Click Start, and then click Run.
2. In the Open box, type cmd.
3. Type net use x: /delete, where x: is the drive letter of the shared
resource.
Disconnect from a mapped network drive
1. Click Start, and then click My Computer.
2. Right-click the icon for the mapped drive.
3. Click Disconnect.
![]() Note: When you disconnect from a mapped drive, you remove the mapped
drive letter that you assigned to the shared resource. You can still
access the resource from My Network Places.
Note: When you disconnect from a mapped drive, you remove the mapped
drive letter that you assigned to the shared resource. You can still
access the resource from My Network Places.
When you create a shortcut to a shared folder in Windows 7 or computer on a network (also called mapping a network drive), you can get to it from Computer or Windows Explorer without having to look for it or type its network address each time.
1.Open Computer by clicking the Start button , and then clicking Computer.
2.Click Map network drive.
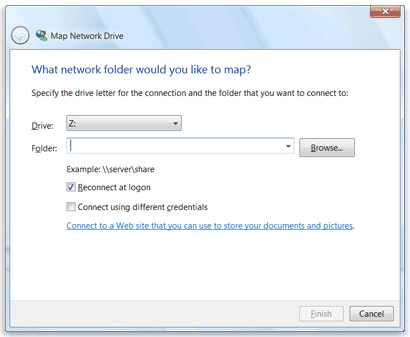
The Map Network Drive dialog box3.In the Drive list, click a drive letter.
You can choose any available letter.
4.In the Folder box, type the path of the folder or computer, or click Browse to find the folder or computer.
To connect every time you log on to your computer, select the Reconnect at logon check box.
5.Click Finish.
Your computer is now connected, or mapped, to the network drive.
![]() Note:
If you can't connect to a network drive or folder, the computer you're
trying to connect to might be turned off or you might not have the
correct permissions. If you can't connect, contact your network
administrator.
Note:
If you can't connect to a network drive or folder, the computer you're
trying to connect to might be turned off or you might not have the
correct permissions. If you can't connect, contact your network
administrator.
You can also create shortcuts to Internet locations, such as websites or
FTP sites. Here’s how to do that:
1.Open Computer by clicking the Start button , and then clicking Computer.
2.Right-click anywhere in the folder, and then click Add a network location.
3.Follow the steps in the wizard to add a shortcut to a location on your network, a website, or an FTP site.
To map a shared folder or a network drive with our network to our computer, we use the Map Network drive. When we use locally connected computers in our home network we always prefer to share our files with other computer devices for eliminating the requirement of manually copying the file to external storage media and after that transfer them to other computers. It will be helpful when we want to quickly access a network drive or a shared folder without remembering the complete path of the location.
In Windows 8 if you want to map any remotely shared folder as a network drive to
your local computer, you have to follow certain steps shown below:
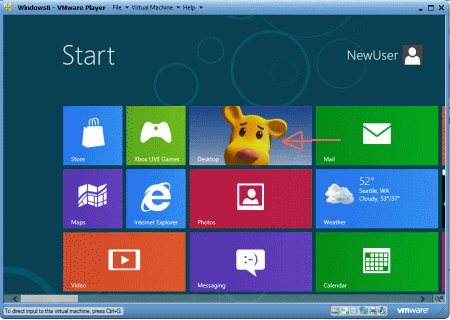
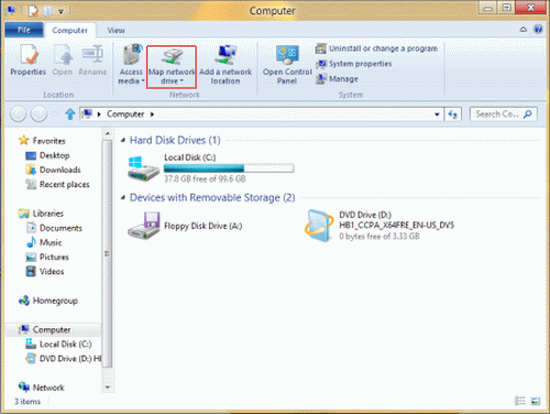
Step 5: Click on "Browse" to select a network drive of the folder; otherwise if you know the folder or drive you can type it directly into the "Folder" text box
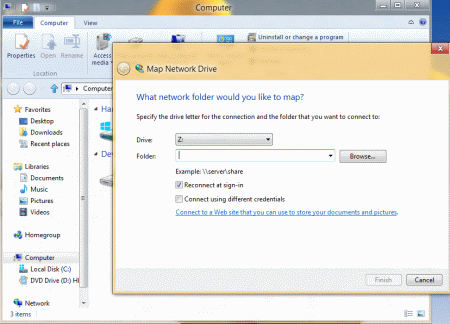
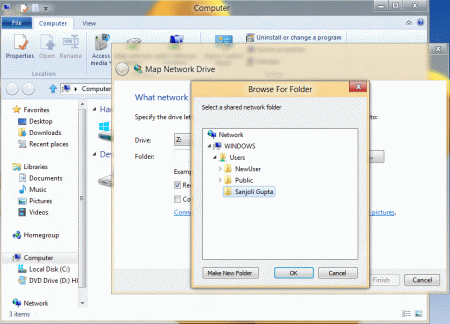
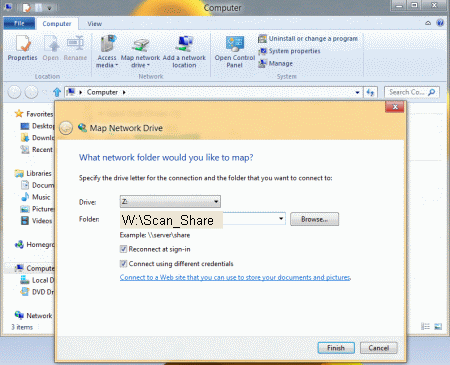
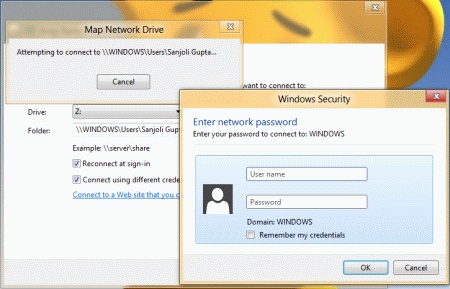
Step 8: Once located, click on Finish button to map the remotely shared folder as a network drive to your local computer
Step
![]() : Setting up
the Scanner Server Software:
: Setting up
the Scanner Server Software:
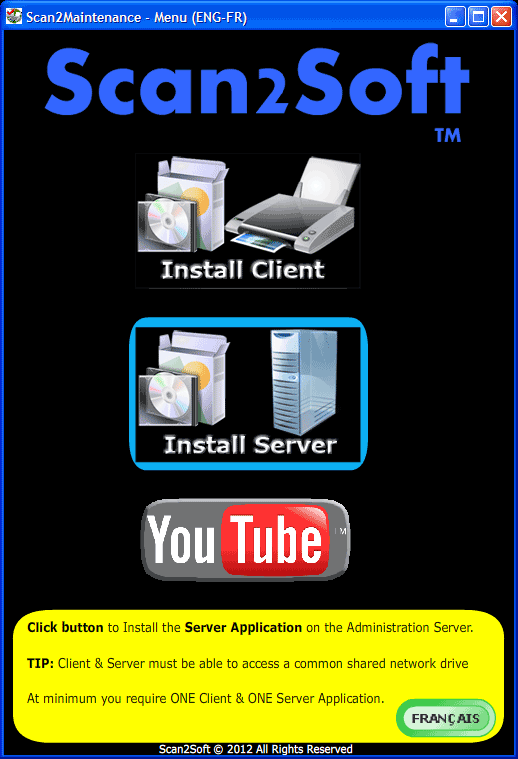
1. Click on the "Install Server" button on the
Scan2Maintenance installer screen and then follow the screen prompts.
2. After the Scan2Maintenance Server Installer has
completed you will be presented with the following Scan2Soft login
screen.

3. Enter your Scan2Soft.com account credentials and
the required start-up checkboxes and then click "ENTER".
 Note:
Check "Automatically Sign me in at Startup" & "Start Minimised"
4. If "Start Minimised" is checked Scan2Maintenace
will be sent to the System Tray, double click the icon to open the user
interface.

5. From the Scan2Maintenace user interface select
the shared scanner folder you set-up in step 1 by clicking on the
"Sync Folder" button.
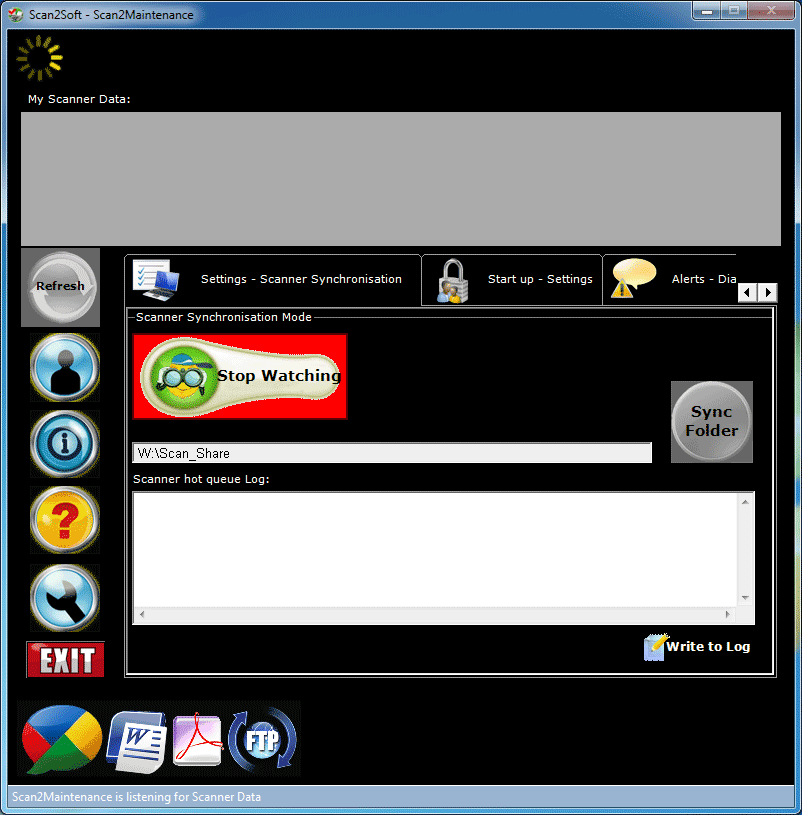
 Note:
"My Scanner Data" list will be blank when you first setup the
application because you haven't synchronised with any scanners yet.

 Note: The
"Sync Folder" button will be greyed out until you click "Stop Watching"
6. After clicking on the "Sync Folder" button browse
to the shared scanner folder.
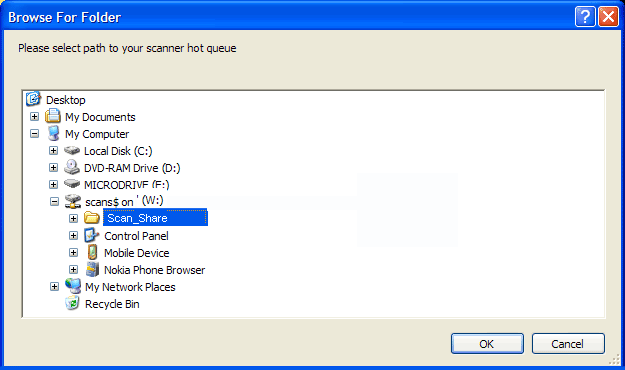
7. Click on the "Start Watching" button to start
listening for scanner activity.

8. From the Scan2Maintenance application tabs click
on "Alerts - Dialogue \ Email" and check the Alert me by Email
and Alert me from System Tray
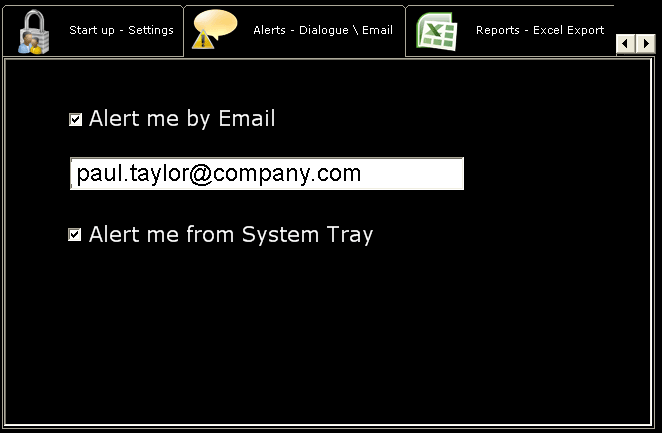
 Note:
Alert me from System Tray will display pop-up messages when the
scanner errors. Alert me by Email will send the scanner errors to
your specified email address.
Now the basic Scan2Maintenace
server setup is complete.
Step
 : Setting up
the Scanner Client Software:
Prerequisites:
 Before installing the Scanner Client Software please ensure you have at
least one Canon DR Driver installed on the client PC. Canon DR Scanner
Drivers can be downloaded from
http://software.canon-europe.com/
 Connect and
switch on your scanner before starting the Scanner Client Installation.
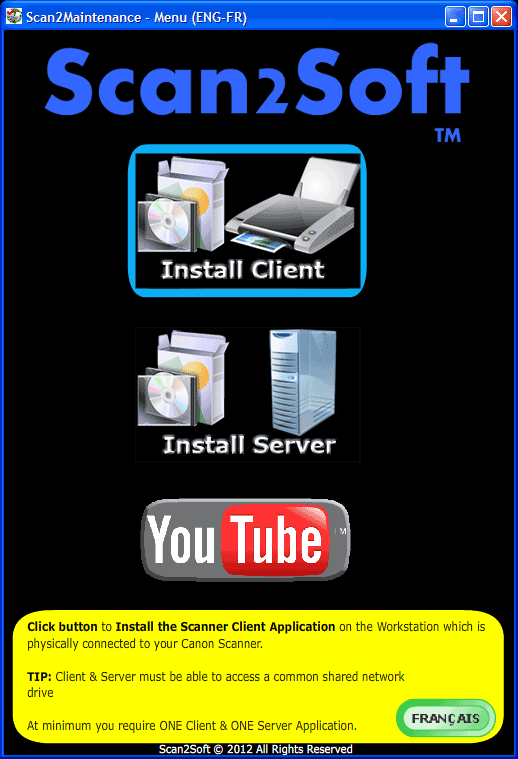
1. Click on the "Install Client" button on the
Scan2Maintenance installer screen and then follow the screen prompts.
2. After installation you will be presented with the below Scanner Client
Main screen.
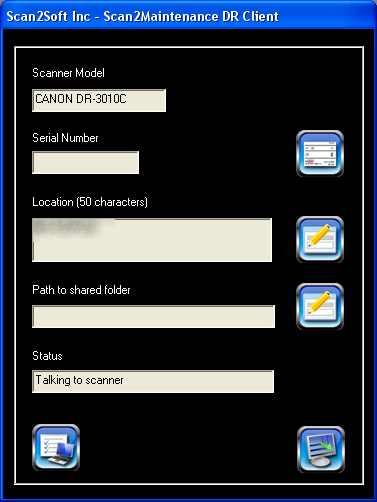
 The client
application will automatically detect the Scanner model and will attempt to
obtain the scanner serial number if this feature is supported in the scanner
firmware. If the scanner serial is not shown please click on

3. On clicking
 please enter the scanner serial number (this is located on the back of the
scanner)
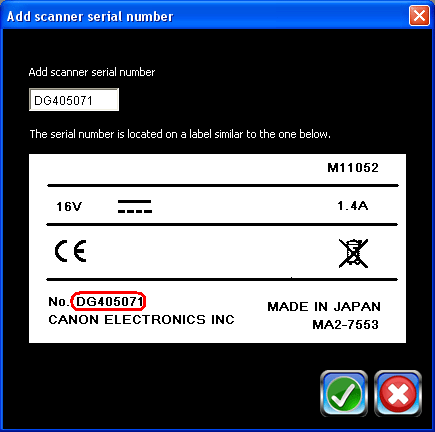
click  after
entering the scanner serial number.
4. Add "Path to shared Folder" by clicking on

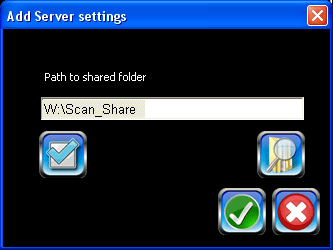
 The path must be the same shared network folder as
setup in Step 2.6
click  after
entering the "Path to shared folder"
5. Add scanner location by clicking on

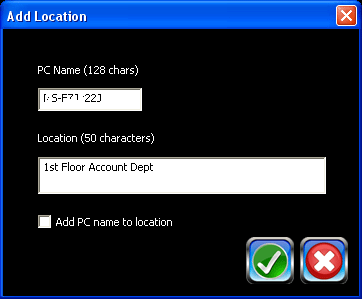
 The scanner
location will default to scanner computer name, however you can enter a more
meaningful name if required, e.g. 1st Floor Account Dept.
click  after
entering the "Location"
6. Click  to hide the Scanner Client Software to system tray.

7. Right click on the system tray icon for additional menu options
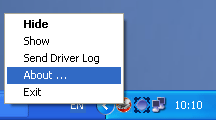
8. Click "About" to view version and support scanner list
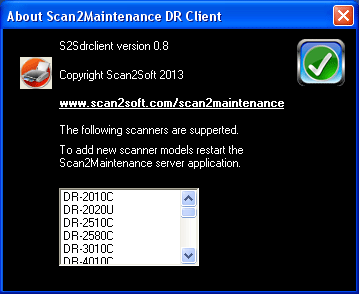
 If your
scanner is not listed then please restart the Scan2Maintenance Server
application. In the event that your scanner model is not listed please email
support@scan2soft.com with your
scanner details so we can update the scanner database.
Now the basic Scan2Maintenace
client setup is complete.
Testing your setup

1. Make sure the Scan2Maintenance Server is running see Step 2

2. Make sure your scanner is switched on and connected to client PC see
Step 3
3. Make sure the scanner client application is running in the system tray
see Step 3

4. Open the Scanner feeder cover as if you were removing a paper jam.
5. Open a scanning application and start a scan targeting your scanner
driver.
6. The scanning application will generate a "Cover Open Error: -4429"
7. On the Scanner Client Application main screen under "Status" you
will see the "Cover Open Error: -4429"
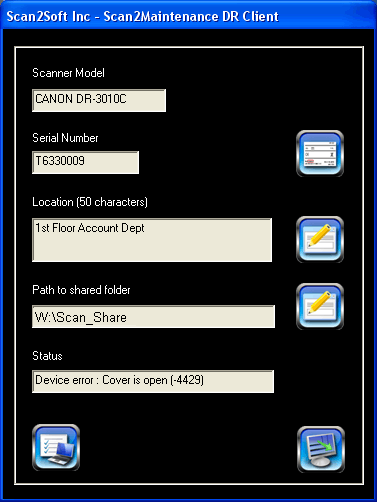
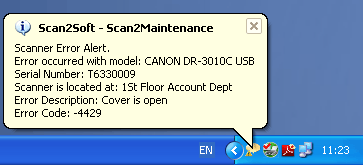
8. On the Scan2Maintenance Server you will see the "Cover Open Error: -4429"
displayed from the System Tray.
9. In your email inbox you will see the "Cover Open Error: -4429"
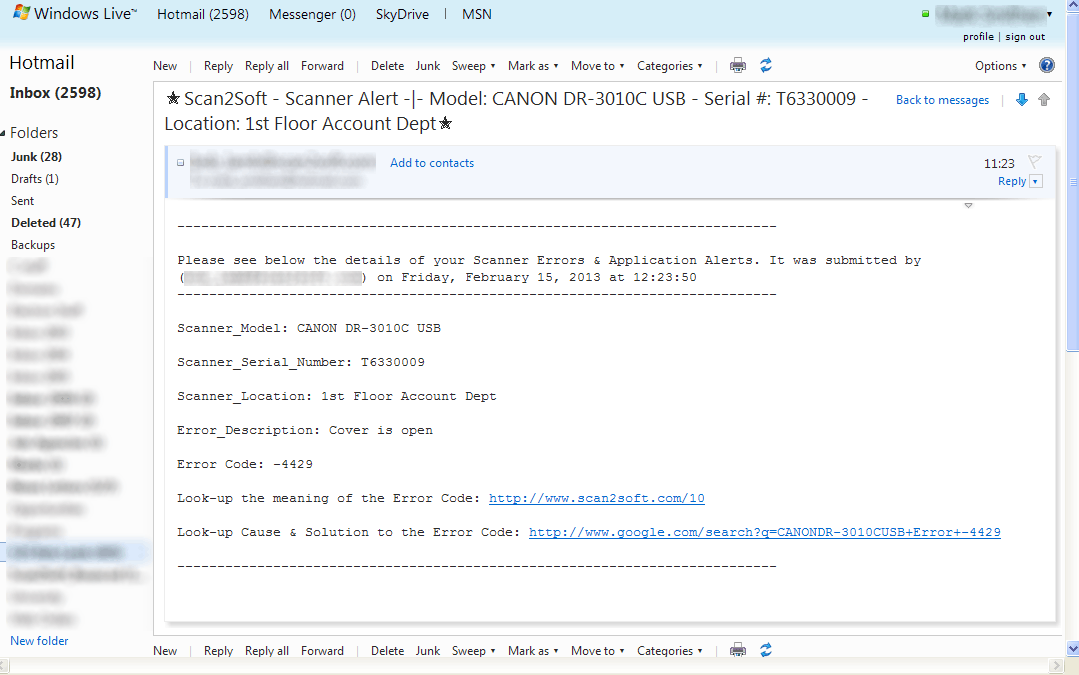
10. The
Scan2Maintenance Server will display scanner
counters, service errors, hardware unit
failures, firmware and software versions, status flag etc.
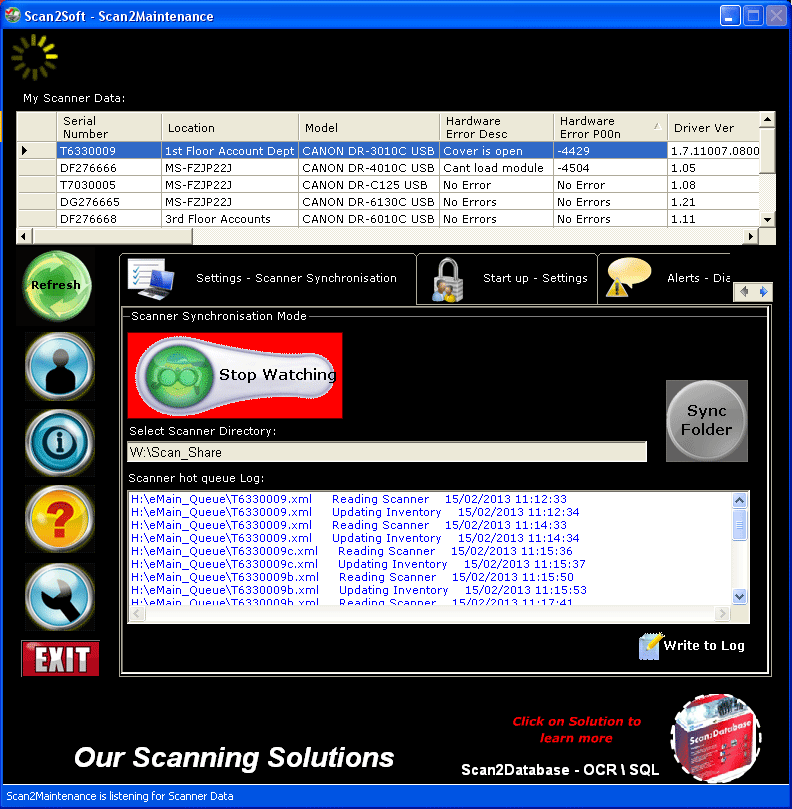
Congratulations, now the testing is complete.
Run an Inventory Report

1. To run an Inventory report scroll to the
"Reports - Excel Export" tab within the Scan2Maintenace Server application.
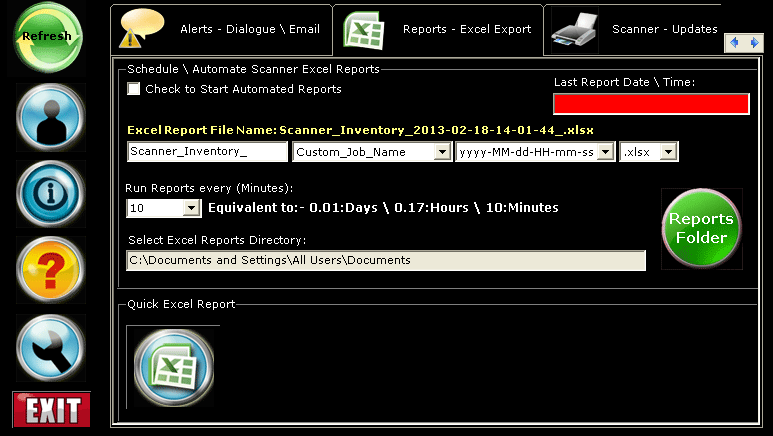
 The
Scan2Maintenace Server requires an installation
of Microsoft Excel 2003, 2010 or 2012 to allow the creation of inventory
reports.
2. Click on
 to
start the inventory reports
3. Save the report or open in Excel
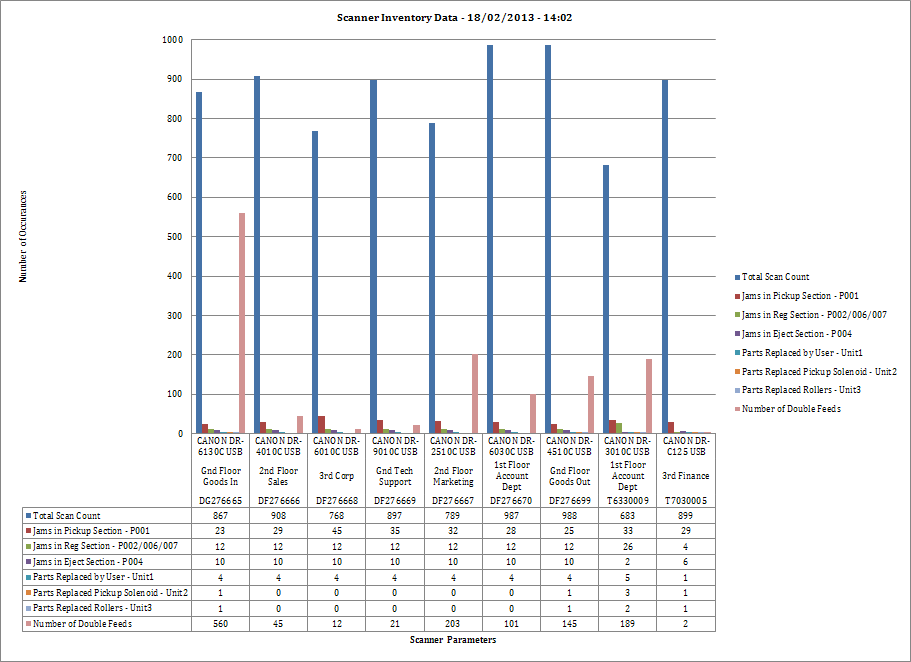


Prerequisites:
![]() Before installing the Scanner Client Software please ensure you have at
least one Canon DR Driver installed on the client PC. Canon DR Scanner
Drivers can be downloaded from
http://software.canon-europe.com/
Before installing the Scanner Client Software please ensure you have at
least one Canon DR Driver installed on the client PC. Canon DR Scanner
Drivers can be downloaded from
http://software.canon-europe.com/
![]() Connect and
switch on your scanner before starting the Scanner Client Installation.
Connect and
switch on your scanner before starting the Scanner Client Installation.

1. Click on the "Install Client" button on the Scan2Maintenance installer screen and then follow the screen prompts.
2. After installation you will be presented with the below Scanner Client Main screen.

![]() The client
application will automatically detect the Scanner model and will attempt to
obtain the scanner serial number if this feature is supported in the scanner
firmware. If the scanner serial is not shown please click on
The client
application will automatically detect the Scanner model and will attempt to
obtain the scanner serial number if this feature is supported in the scanner
firmware. If the scanner serial is not shown please click on
![]()
3. On clicking
![]() please enter the scanner serial number (this is located on the back of the
scanner)
please enter the scanner serial number (this is located on the back of the
scanner)

click ![]() after
entering the scanner serial number.
after
entering the scanner serial number.
4. Add "Path to shared Folder" by clicking on
![]()

![]() The path must be the same shared network folder as
setup in Step 2.6
The path must be the same shared network folder as
setup in Step 2.6
click ![]() after
entering the "Path to shared folder"
after
entering the "Path to shared folder"
5. Add scanner location by clicking on
![]()

![]() The scanner
location will default to scanner computer name, however you can enter a more
meaningful name if required, e.g. 1st Floor Account Dept.
The scanner
location will default to scanner computer name, however you can enter a more
meaningful name if required, e.g. 1st Floor Account Dept.
click ![]() after
entering the "Location"
after
entering the "Location"
6. Click ![]() to hide the Scanner Client Software to system tray.
to hide the Scanner Client Software to system tray.

7. Right click on the system tray icon for additional menu options

8. Click "About" to view version and support scanner list

![]() If your
scanner is not listed then please restart the Scan2Maintenance Server
application. In the event that your scanner model is not listed please email
support@scan2soft.com with your
scanner details so we can update the scanner database.
If your
scanner is not listed then please restart the Scan2Maintenance Server
application. In the event that your scanner model is not listed please email
support@scan2soft.com with your
scanner details so we can update the scanner database.
Now the basic Scan2Maintenace client setup is complete.
Testing your setup

1. Make sure the Scan2Maintenance Server is running see Step 2

2. Make sure your scanner is switched on and connected to client PC see Step 3
3. Make sure the scanner client application is running in the system tray see Step 3

4. Open the Scanner feeder cover as if you were removing a paper jam.
5. Open a scanning application and start a scan targeting your scanner driver.
6. The scanning application will generate a "Cover Open Error: -4429"
7. On the Scanner Client Application main screen under "Status" you will see the "Cover Open Error: -4429"

8. On the Scan2Maintenance Server you will see the "Cover Open Error: -4429" displayed from the System Tray.

9. In your email inbox you will see the "Cover Open Error: -4429"

10. The Scan2Maintenance Server will display scanner counters, service errors, hardware unit failures, firmware and software versions, status flag etc.

Congratulations, now the testing is complete.
Run an Inventory Report

1. To run an Inventory report scroll to the "Reports - Excel Export" tab within the Scan2Maintenace Server application.

![]() The
Scan2Maintenace Server requires an installation
of Microsoft Excel 2003, 2010 or 2012 to allow the creation of inventory
reports.
The
Scan2Maintenace Server requires an installation
of Microsoft Excel 2003, 2010 or 2012 to allow the creation of inventory
reports.
2. Click on
 to
start the inventory reports
3. Save the report or open in Excel

